| ePER Manual | 

 |
|
|
2.3 Use of the DVD on local network ePER in
the DVD version, can be used in either local mode (by installing and using it
on the actual PC) or in shared mode with a corporate network (local network). The diagram below illustrates an example of
local network installation:
Fig. 1:
Use of the DVD on local network PC SERVER: This is the PC where ePER should be installed using the
setup procedure on the DVD. Once installed on the PC SERVER, ePER can be used
both on the actual PC SERVER (by clicking on the program launch symbol) and, at
the same time, by PCs connected in a local PC CLIENT network: The
procedure for installing and using ePER in shared mode is the following: 1)
Install ePER on
the PC SERVER following the instructions in paragraph 2)
Execute ePER on
the PC SERVER. In order to be able to be used by the CLIENT PCs it is necessary
for ePER to be working on the PC SERVER (see next chapter: "Launching the
program") 3) Open Internet Explorer on the CLIENT PCs and type
in the TCP address and port the PC SERVER. In the example the server address would be: Note: during installation ePER is configured to use port 7080
TCP. However, this setting can be modified if this port is already being used
by the PC SERVER for other applications.
|
 1 An overview of Fiat ePER
 2 Requirements and installation
  3 Launching the program
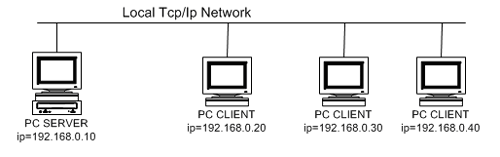
| Copyright (c) 2011, Fiat Group Automobiles |